Step 2: Create Tracking Data
Using SimBA to create/edit DeepLabCut
Warning
IF YOU ALREADY HAVE GENERATED A DLC TRACKING MODEL AND CREATED .CSV DATAFRAMES FOR YOUR EXPERIMENTAL VIDEOS (USING THE ANNOTATION CONFIGURATION DETAILED IN THE FIGURE BELOW), PLEASE SKIP THIS ENTIRE PAGE AND MOVE ON TO STEP 3: BUILDING CLASSIFIERS
See “Pose estimation body-part labelling” below for supported rodent annotation formats. You must use one of these formats if you would like to use our included feature list for creating predictive classifiers. We strongly suggest using 8 body parts per rodent.
Again, if you have generated your DLC tracking using another body part labelling configuration, it will not work “right out of the box”!
Note
Some versions of DeepLabCut saves data in hdf5 format by default. For information on how to output DeepLabCut data in csv file format, go to the DeepLabcut repository
DeepLabCut is currently fully supported by the SimBA pipeline. We strongly suggest that users generate their DLC tracking model using the DLC GUI. This will provide the most up-to-date and pleasurable annotation experience, followed by loading the generated DLC tracking data and raw videos into SimBA. Future iterations will include tracking support for mask R-CNN, LEAP, DeepPoseKit, etc, as requested by the community.
IF YOU STILL WOULD LIKE TO GENERATE YOUR DLC TRACKING MODEL AND .CSV DATAFRAMES VIA SIMBA, CONTINUE…
Note
This section of SimBA was written early on - when DeepLabCut was accessed exclusively by the command line and did not come with the excellent graphical user interface it comes with today. At that early point we added DeepLabCut commands to SimBA to make many of the important DeepLabCut functions accessible for all members of the lab, regardless of previous programming experience. We have left these features in the current build, as an option for use.
Pose estimation body-part labelling
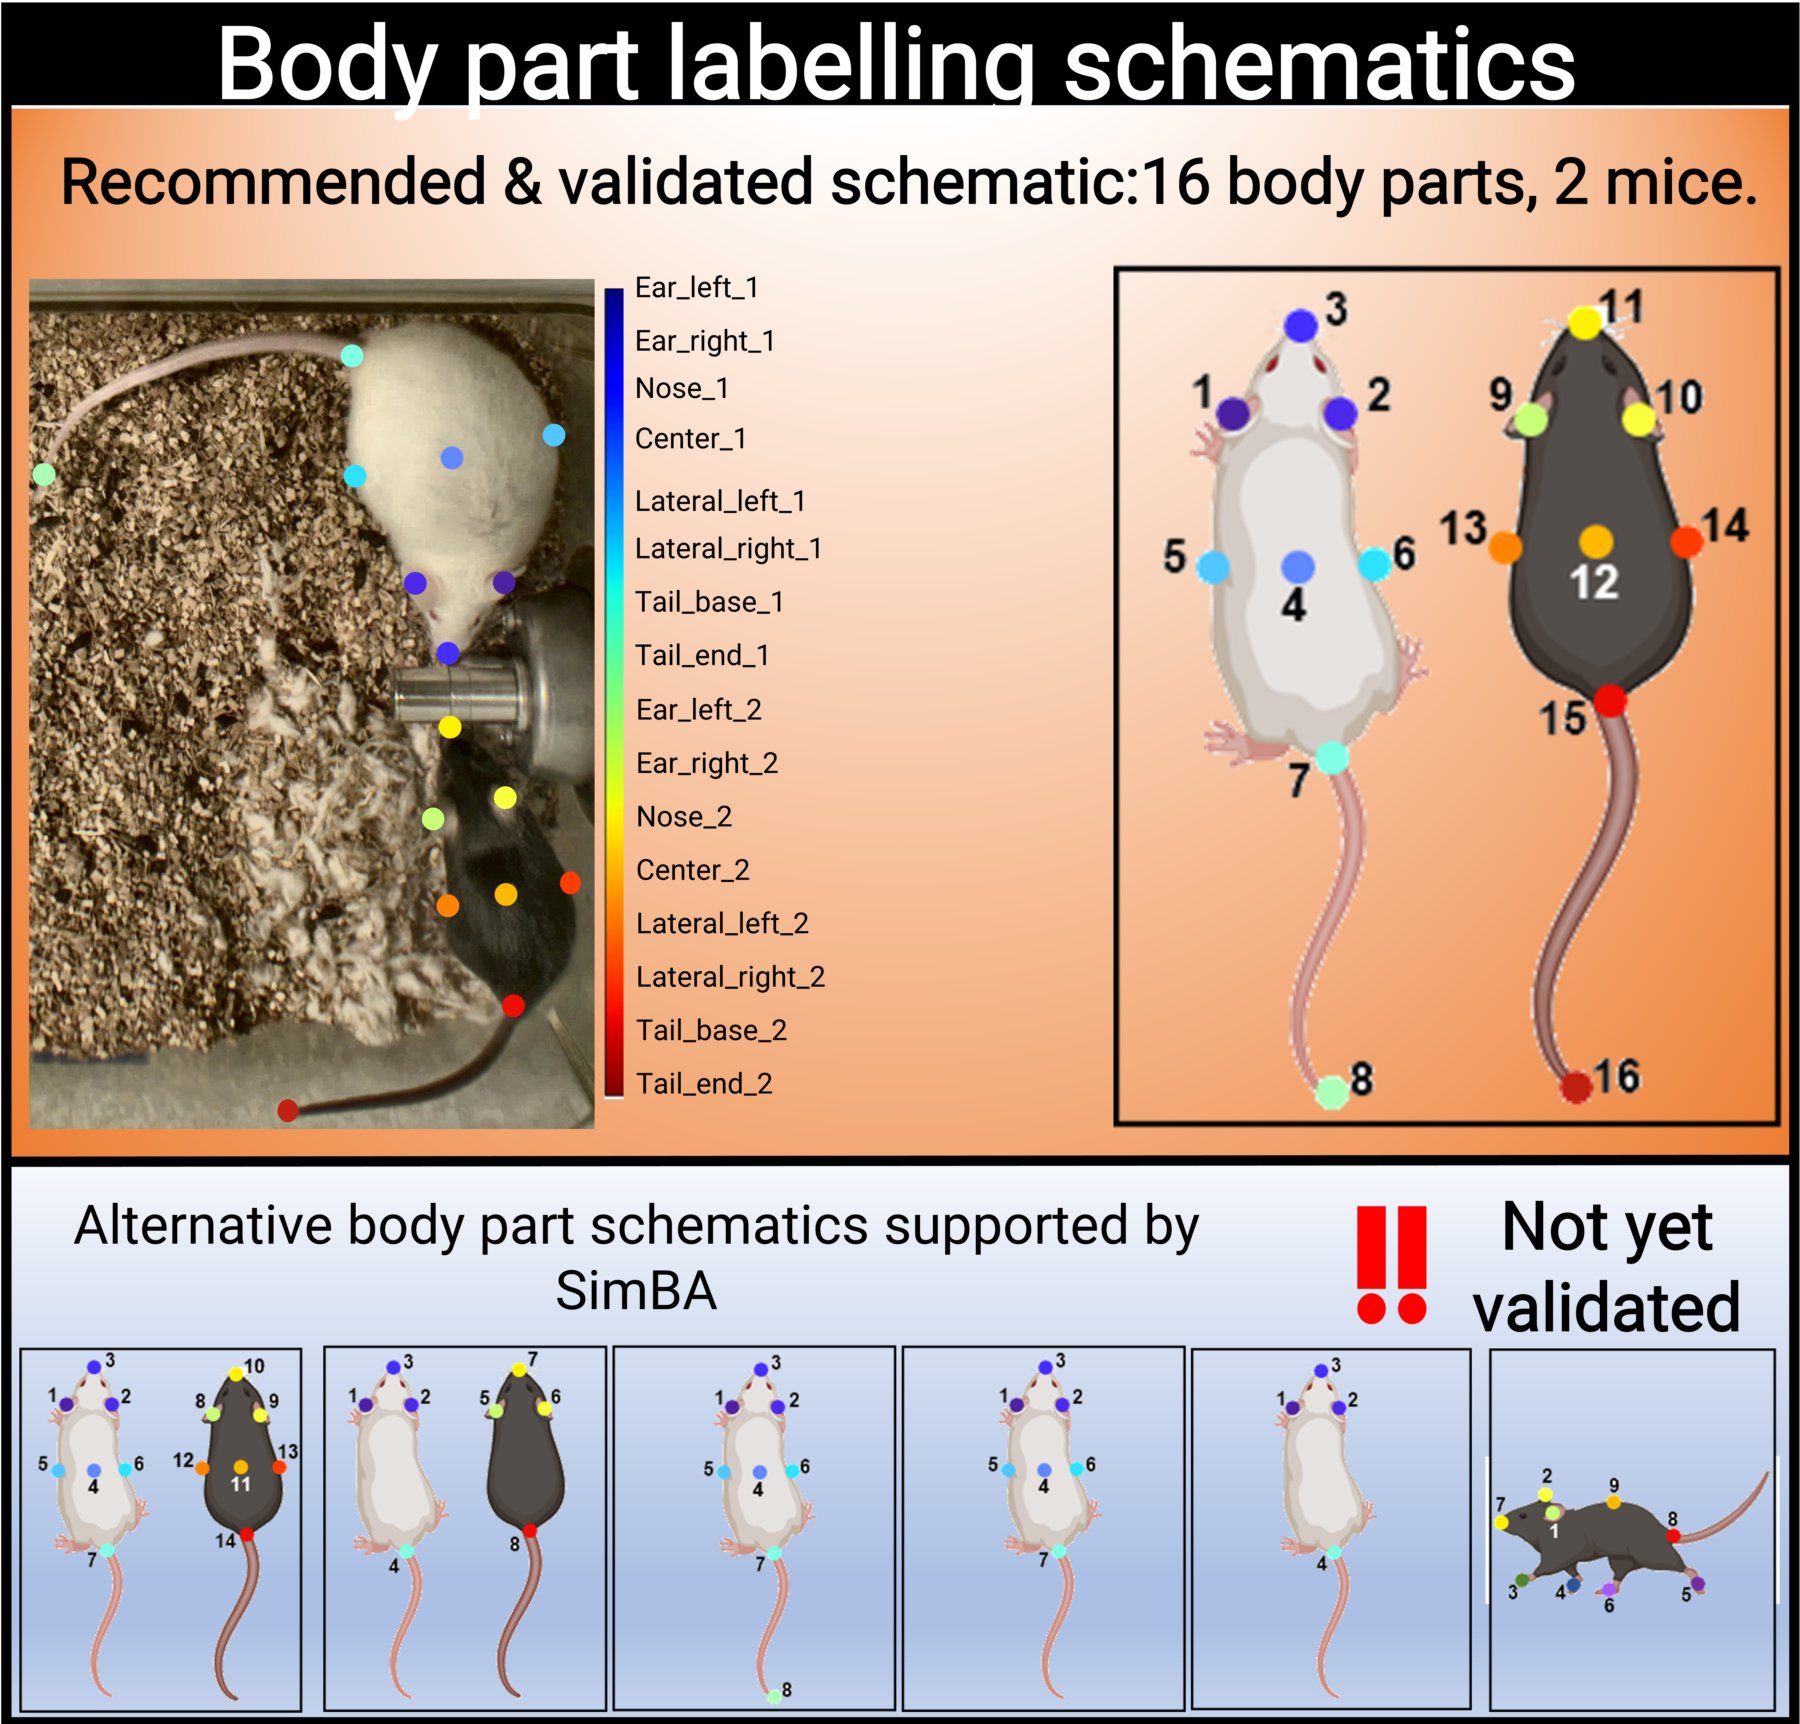
SimBA uses the tracking data to construct a battery of features (for a list of features with example descriptions, click here. The number of labelled body parts, and which body parts are labelled and tracked, determines which features can be calculated.
We have validated SimBA by labelling 16 body parts (8 body parts on two individual mice) and we strongly advice users to use the same body part labelling schematic.
Please note that the order of body part annotation is important, and matches the labelling schematic above.
If using SimBA, set the DeepLabCut config to use the 16 body part schematic by checking the
Apply Golden Aggression Config box (See Step 1, below). Pre-trained DLC tracking models using the 16 body part
schematic and two animals can also be downloaded through OSF, covering a range of acquisition
parameters (color video, blank and white video, etc).
However, SimBA will also accept alternative body labelling schematics (see the above figure). These alternative schematics currently include:
7 body parts on two individual mice recorded 90° above angle
4 body parts on two individual mice recorded 90° above angle
8 body parts on a single mouse recorded 90° above angle
7 body parts on a single mouse recorded 90° above angle
4 body parts on a single mouse recorded 90° above angle
9 body parts on a single mouse recorded 45° side angle
Note
So far we have only validated machine learning models that use features calculated from 16 labelled body parts on two individual animals. The other configurations are “use at your own risk” and may require trouble-shooting.
Note
SimBA now also supports user-created body-part annotation schemes. These annotations schemes can be created in the SimBA project configuration menu - click HERE to learn more.
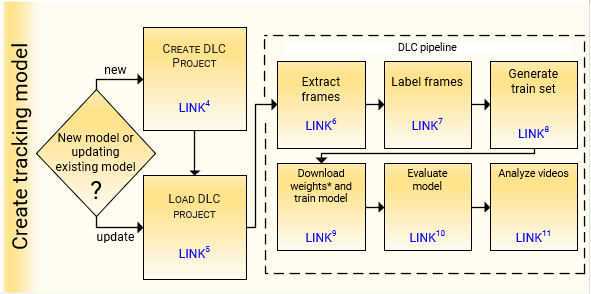
SimBA-DLC Pipeline breakdown
For detailed information on the DeepLabCut workflow, see the DeepLabCut repository
The SimBA-DLC pipeline is confirmed compatible with DLC v2.0.9.
Note
All videos should have been pre-processed, see Step 1: Video pre-processing, prior to DLC tracking.
Part 1: Create DLC Model
Use this menu to create a new project for your DeepLabCut pose-estimation tracking analysis.
Step 1: Generate a new DLC model.
This step generates a new DeepLabCut project.
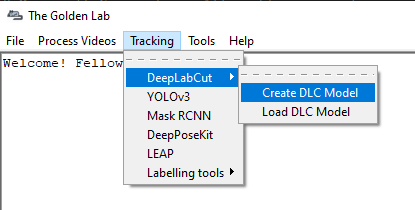
In the main SimBA window, click on
Tracking–>DeepLabCut–>Create DLC Model. The following window will pop up.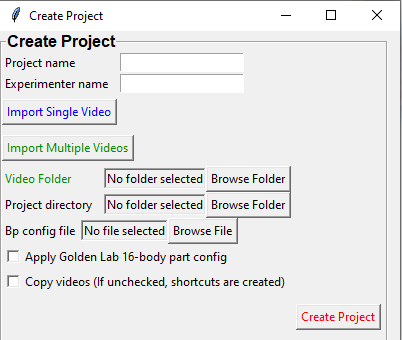
Enter the name of your project in the
Project nameentry box.Enter the name of the experimenter in the
Experimenter nameentry box.
Note
Spaces are not allowed in the project name or the experimenter name.
4. Next, import the videos into your project. If you are adding only one video, you can click on Import Single Video
and the Video Folder in green should change to Video Path blue. Next, click on Browse File to select a
video file.
5. To import multiple videos into your project, click on Import Multiple Video and the green Video Folder
will appear. Click on Browse Folder and choose a folder containing the videos to import into your project.
Note
The default settings is to import multiple videos.
6. Next, select the main directory that your project will be located in. Next to Project directory,
click on Browse Folder and choose a directory.
7. Optional: If you have previously created a SimBA project, and a user-defined body-part configuration schematic
in SimBA, you may want to use this configuration in your DeepLabCut tracking project. If so, go ahead and click on
Browse File next to the text Bp config file. These body-part configurations are saved in you SimBA project, in a
CSV file located in the project_folder/logs/measures/pose_configs/bp_names\project_bp_names.csv file.
Navigate to this file and select it. If you do not want to use a SimBA-created bosy-part configuration file,
leave the Bp config file entry box empty.
8. If you wish to use the settings used by the Golden lab (this setting is used to track two mice, and eight body parts
on each of the two mice) check the Apply Golden Aggression Config box. For more information, see above section and
figure. If you wish to generate your own DeepLabCut tracking config, using a different annotation configuration, please
leave this box un-ticked.
9. You can either copy all the videos to your DeepLabCut project folder, or create shortcuts to the videos. By checking
the Copy Videos checkbox, the videos will be copied to your project folder. If this box is left un-ticked,
shortcuts to your videos will be created. This can be useful if you wish to save storage space, or if you have very
large or numerous video files.
10. Click on Create Project to create your DeepLabCut project.
The project will be located in the chosen working directory.
You will need to Load this project to use it. Move to Part 2 below.
Part 2: Load DLC Project
These menus are used to load created DeepLabCut projects.
Step 1: Check the settings in the DeepLabCut config.yaml file
Go to the project folder.
Double click on the config.yaml file and open it in a text editor like Notepad.
Change the settings if necessary.
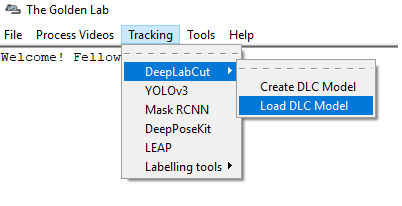
Step 2: Load the DeepLabCut config.yaml file
In the main SimBA window, click on
Tracking–>DeepLabCut–>Load DLC Model. The following window will pop up.Under the Load Model tab, click on
Browse Fileand load the config.yaml file from your project folder.
Step 3: Add additional videos to the project (optional)
This step can be useful if you would like to add new videos to refine your tracking model that were not avilable previously.
Single Video
1. Under the Add videos into project tab and Single Video heading, click on Browse File and
select the video you wish to add to the project.
Click on
Add single video.
Multiple Videos
1. Under the Add videos into project tab and Multiple Videos heading, click on Browse Folder and select
the folder containing the videos you wish to add to the project.
Click on
Add multiple videos.
Step 4: Extract frames for labeling body parts using DLC. For more details, see the DeepLabcut repository
1. Under the Extract/label frames tab tab and Extract Frames DLC heading, enter the number of frames you
wish to extract from the videos in the numframes2pick entry box.
Select the Mode of extracting the frames.
Automaticselects the frames to extract automatically.Manualallows you to select the frames to extract.
Select the Algorithm used to pick the frames to extract.
Uniformselects the frames uniformly in a series format.KMeansuses k-means clustering algorithm to select the frames randomly based on cluster.Cluster Resize Widthis the setting for KMeans. The default is set to 30.Cluster Stepis the setting for KMeans. The default is set to 1.
To use color information for clustering, check the
Truebox next to Cluster Color.
5. If you wish to use OpenCV to extract frames, check the True box. If you wish to use ffmpeg,
keep this box un-checked.
Click on
Extract Framesto begin to extract the frames.
Step 5: Label Frames
1. Under Label Frames heading in the Extract/label frames tab tab, click on Label Frames and the
DeepLabCut- Labelling ToolBox will pop up.
Click on Load Frames located in the bottom left-hand corner.
3. Navigate to the folder with the video name where your extracted frames are saved, and click Select Folder.
They should be located at workingdirectory/yourproject/labeled-data/
4. Now you can start labelling frames. For more details, see the DeepLabCut repository
Once all the frames are labelled, move on to Step 6.
Step 6: Check Labels
Under Check Labels, click on
Check Labelled Framesto check the labelled frames.
Step 7: Generate training set
Under Generate Training Set, click on the
Generate training setbutton to generate a new training set.
Step 8: Train Network
Train the model using a training set. Note that there are two scenarios:
1. Training from scratch: In the iteration entry box, fill in an integer (e.g., 0) representing the model
iteration number. Once done, click on Update iteration. If left blank, then the iteration number will be the most
recently used. If the iteration number isn’t specified, and you are working with a new project, it will default to 0.
2. Training from previous weights: In the init_weight box, specify the path to the initial weights. If this is
left blank it will default to resnet-50. If you want to use other weights, click on Browse File.
Pre-trained weights for mouse and rat resident-intruder protocols using 16 body-parts, as well as other pre-trained
weights, can be downloaded here. Downloaded weights may consist of three files
(.index, .meta, .data). In the init_weight box, specify the path to any of the three downloaded files.
Step 9: Evaluate Network
1. Click on Evaluate Network to evaluate the trained model. For more details, see the
DeepLabCut repository
Step 10: Video Analysis
Single Video Analysis
1. Under the Video Analysis tab and the Single Video Analysis header, click on Browse File and select one
video file.
Click on
Single Video Analysis.
Multiple Videos Analysis
1. Under the Video Analysis tab and the Multiple Videos Analysis header, click on Browse Folder and select a folder containing the videos you wish to analyze.
2. Enter the video format in the Video type entry box (eg: mp4, avi). Do **not* include any ” . ” dot in the entry
box (e.g,: for example, do not enter .mp4, .flv, or .avi. Instead enter mp4, flv, or avi*).
Click on
Multi Videos Analysis.
Step 11: Plot Video Graph
Click on
Browse Fileto select the video.
2. Click on Plot Results. For more details, see the
DeepLabCut documentation
Step 12: Create Video
This step will generate a video with labelled tracking points.
Click on
Browse Fileto select the video.
2. You can choose to save the frames with tracking points on the video, and not just the compressed video file,
by checking the Save Frames box. This process takes longer if you want to render to whole video.
However, if you just want to check on a few frames how the model is doing, you can render a few images and terminate
the process and save time.
Click on
Create Video.
Part 3: Improve the Model
There are two ways that you can improve DeepLabCut generated tracking models.
Extract more frames to train the model.
Correct the predictions made by the model on new frames.
Extract more frames
This step automates the Extract Frames process to only extract frames from select videos. This function will copy the settings from the DeepLabCut config.yaml and remove all the videos in the config.yaml file. The function will then add the new videos that the user specifies into a new, temporary yaml file, and extract frames from only the videos included in the temporary yaml file.
Step 1: Generate temp.yaml from the original config.yaml
Single Video
Under Load Model, click
Browse Fileand select the config.yaml file.Under
[Generate temp yaml]tab –>Single video, click on Browse File and select the video.Click on
Add single videoA temp.yaml file will be generated in the same folder as the project folder.
Multiple Videos
Under Load Model, click
Browse Fileand select the config.yaml file.
2. Under [Generate temp yaml] tab –> Multiple videos, click on Browse Folder and select the folder
containing only the videos you want to add to your peoject and extract additional frames from.
Click on
Add multiple videos.A temp.yaml file will be generated in the same folder as the project folder.
Step 2: Load temp.yaml
Under Load Model, click
Browse Fileand select the temp.yaml that you have just created.Now you can extract frames of the videos that you have just added. Return to Part 1, Step 4 to update the model with the new frames.
Tracking Point Correction
Step 1: Load config.yaml
Go to
Tracking–>DeepLabCut–>Load DLC Model.Under Load Model, click on Browse File and load the config.yaml file from the project folder.
Step 2: Extract Outliers
Under Extract Outliers, click
Browse Fileto select the videos to you want to extract outlier frames from.Click on
Extract Outliers.
Step 3: Label Outliers
Under Label Outliers, click on
Refine Outliers. The DeepLabCut - Refinement ToolBox will pop open.
2. In the bottom left-hand corner, click on Load labels and select the machinelabels file to start to correct the tracking points. For more information on how to correct outliers in DeepLabCut, go to the DeepLabCut repository
Step 4: Merge Labelled Outliers
Under Merge Labeled Outliers, click on Merge Labelled Outliers to add the labelled outlier frames to your dataset.