Step 1: Processing videos in batch
It is often helpful, and sometimes necessary, to pre-process experimental videos prior to analysis. This is generally accomplished through the use of open-source approaches like FFmpeg or commercial software, but can be a time consuming and cumbersome when applying to numerous similar videos. To streamline this process, SimBA incorporates FFmpeg into a a batch-process GUI.
This video pre-processing tool allows you to change multiple video parameters (clip/trim/crop, etc.) for multiple videos in a batch-process that is rapidly configured and then executed when ready. Once the required parameters has been set for all the videos, the user press Execute and the new videos will be generated according to the user input. Videos are processed using FFmpeg. Click here to learn how to install FFmpeg on your computer.
Note
Processing numerous high-resolution or long-duration videos takes time. We strongly suggest that you not execute a batch until you are ready to commit computational time to the process.
We suggest pre-processing videos in the following scenarios:
Red-light: If you have recorded in red-light conditions, we suggest converting to gray-scale and using CLAHE.
Reflections: If your recordings include reflections on the walls of your testing apparatus, we suggest cropping to remove the reflections.
Artifacts: If your recordings include frames where your hands (or other unintended features) are included in the video, at either the start or the end, we suggest trimming the videos to remove these frames.
Resolution: If your recordings are significantly higher resolution than needed, we suggest down-sampling to decrease processing time.
Pipeline
The video parameters that you specify will be processed in the following sequence. If the user leaves certain parameters unchanged, then they are ignored in the pipeline.

Step 1: Folder Selection
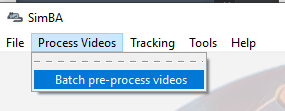
To begin batch pre-processing, in the main SimBA window click on
Process Videos–>Batch pre-process videos. The window shown below will display.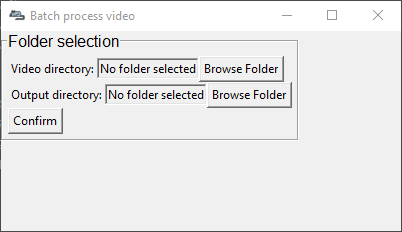
Under Folder Selection heading and next to
Video directory, click onBrowse Folderand navigate to a folder that contains the videos that should be batch processed and click onSelect Folder. All vidoes that you would like to process must be present in this directory.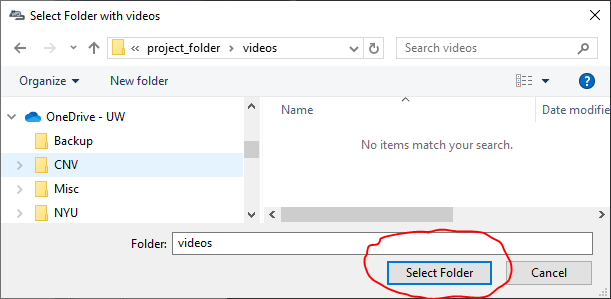
Next to
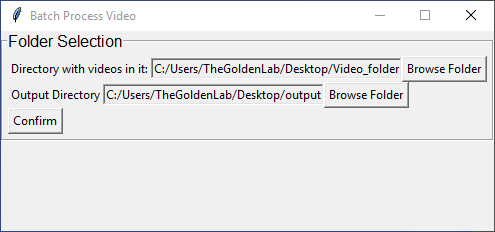
Output Directory, click onBrowse Folderand navigate to a folder (usually a new, empty, folder) that should store the processed videos and click onSelect Folder.Click to
Confirmthe two selected directories.
Note
Please make sure there is no spaces in your folder names or video names, use underscores if needed.
Step 2: Select parameters
Once you select
Confirm, a table listing the videos in theVideo directoryfolder will auto-generate and display. This sequence of videos will now be processed with the parameters you selected, started with the cropping function.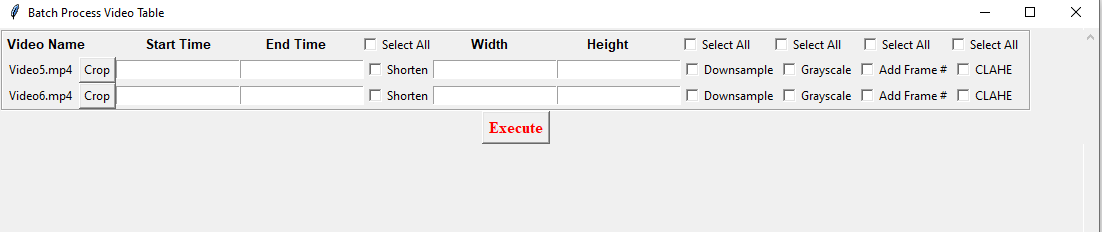
If you wish to crop your videos, click on the
Cropbutton. A frame from the video will pop up. Left click on the frame and drag the rectangular bounding box to mark the region of the video you wish to keep. Once the rectangle is marked, double tap “Enter” on your keyboard. (The relevant crop button will turn red once you have selected to crop a video)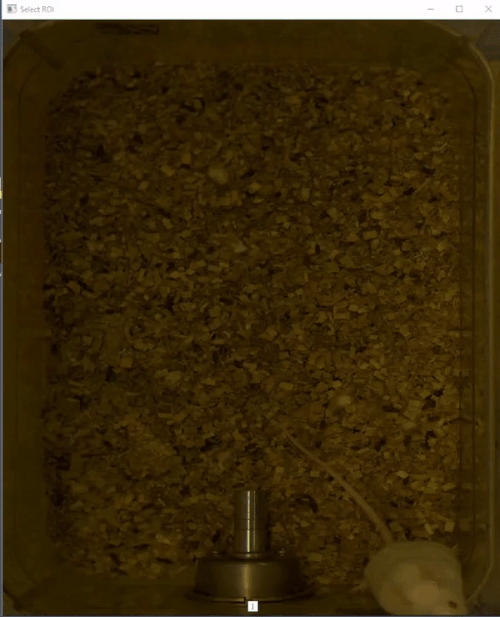
If you wish to trim a specific video, check the
Shortenbox and enter the Start Time and End Time in the HH:MM:SS format.If you wish to downsample a specific video, check the
Downsamplebox and enter the Width and Height in pixels.If you wish to change a specific video to grayscale, check the
Grayscalebox.If you wish to superimpose the specific frame numbers onto the frames of the video, check on the
Add Frame #box. For an example output video with frame numbers overlaid, click hereIf you wish to apply CLAHE, check on the
CLAHEbox. For more information on CLAHE, click hereIn the first row of the table, there are
Select Allcheckboxes. Use these checkboxes to apply a manipulation to all of the videos in the folder.
Note
We know that the Select All checkbox might be slightly off position in the table. We are working on a fix.
Step 3: Execute
Once all the parameters are set, click on
Execute.The final output videos will be saved in the
Output Directorythat you selected in Step 1.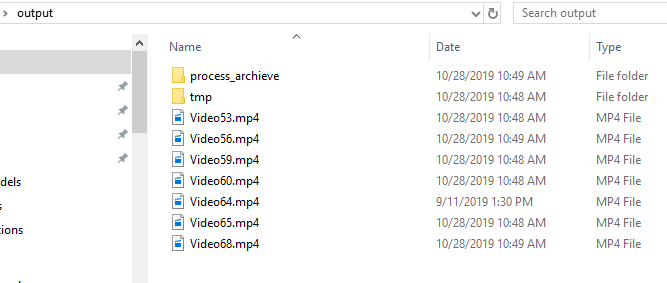
A subfolder in the
Output Directorycalled tmp will contain the step-by-step processsed videos.The process_archieve folder contains a .txt file that lists the processes that were run.
The Output Directory will contain all the final processed videos.